How to Install Tile Floor: A Step-by-Step Homeowner Guide for Remodeling Projects
31 January 2026
Tile flooring is a popular choice for kitchens, bathrooms, entryways, and living spaces because it’s durable, moisture-resistant, and easy to maintain. While installing tile floor can be a rewarding project, it requires careful planning, patience, and attention to detail. Many tile failures don’t happen right away—they show up months or years later due to poor preparation or rushed installation.
This guide walks through how to install tile floor step by step, explains where homeowners often run into trouble, and helps you decide when DIY makes sense versus when professional installation may be the better option.
Is Installing Tile Floor a DIY Project or a Professional Job?
Installing tile floor is achievable for many homeowners, but it isn’t beginner-friendly in the same way painting or trim work might be. The process is physically demanding and detail-oriented, and mistakes are difficult to hide once the tile is set.
DIY tile installation can work well for small, square rooms with flat subfloors and standard tile sizes. Projects involving uneven floors, large-format tiles, or whole-home installations tend to be more complex and less forgiving. Understanding the scope of your project before starting can save time, money, and frustration.
Tools and Materials Needed to Install Tile Floor
Essential Tools
Most tile floor installations require:
- Notched trowel
- Tile spacers
- Tile cutter or wet saw
- Level and straightedge
- Grout float
- Buckets and sponges
Materials
You’ll also need:
- Floor tile
- Thinset mortar
- Cement backer board or uncoupling membrane
- Screws and mesh tape
- Grout and, in some cases, sealer
Choosing the right materials for your tile type and room conditions is just as important as installation technique.
Preparing the Subfloor (The Most Important Step)
Subfloor preparation is where most tile installations succeed or fail. Tile requires a flat, stable, and properly supported surface. Installing tile directly over plywood without proper reinforcement often leads to cracked grout or loose tiles.
Subfloors should be structurally sound and meet flatness requirements, especially for large-format tile. Cement backer board or uncoupling membranes are commonly used to provide a suitable tile base. For homeowners unsure whether their subfloor is ready, working with experienced flooring installers like Best Floor Coverings can help ensure proper preparation and long-term performance.
Planning Your Tile Layout
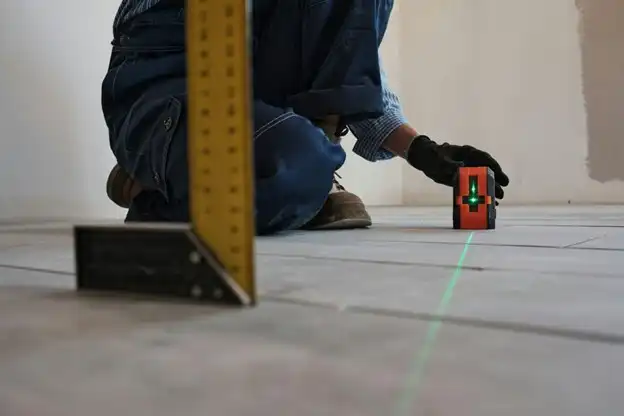
Measuring and Finding the Center Point
Before mixing mortar, dry-lay tiles to plan the layout. Finding the center of the room and working outward helps prevent narrow tile slivers along walls and creates a more balanced appearance.
Tile Orientation and Pattern Choices
Straight patterns are the easiest to install, while diagonal or staggered patterns require more cutting and planning. Large-format tiles demand especially precise layout and flatness to avoid uneven edges.
Installing Cement Backer Board or Uncoupling Membrane
Tile should never be installed directly onto standard plywood. Cement backer board or an uncoupling membrane is installed over the subfloor using thinset and fasteners. Seams are taped and mudded to create a continuous, stable surface.
This layer allows the tile system to handle movement and moisture without cracking.
Mixing and Applying Thinset Mortar
Choosing the Right Mortar
Modified or unmodified thinset is selected based on tile type, size, and substrate. Using the wrong mortar can compromise adhesion and durability.
Proper Trowel Technique
Thinset is applied with a notched trowel held at a consistent angle. Proper coverage ensures the tile bonds fully and reduces the risk of hollow spots.
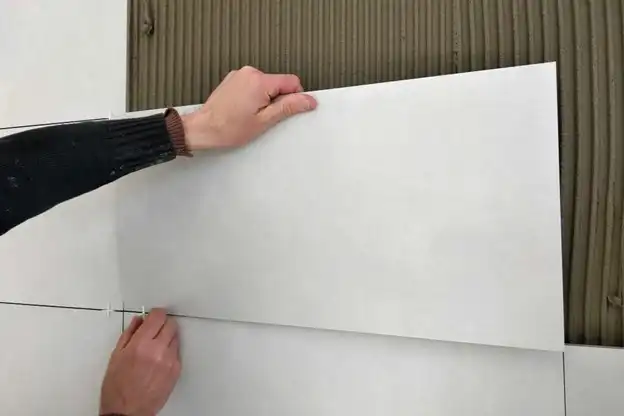
Setting the Tile
Tiles are set into the mortar using gentle pressure and slight twisting. Spacers maintain consistent grout lines, and a level is used frequently to keep tiles even. Working in small sections helps prevent thinset from drying before tiles are placed for interior fittings.
Cutting Tile for Edges, Corners, and Obstacles
Tile cuts are required around walls, doorways, cabinets, and fixtures. Manual cutters work well for straight cuts, while wet saws handle complex or angled cuts more cleanly. Accurate measuring and patience are key to clean results.
Grouting the Tile Floor
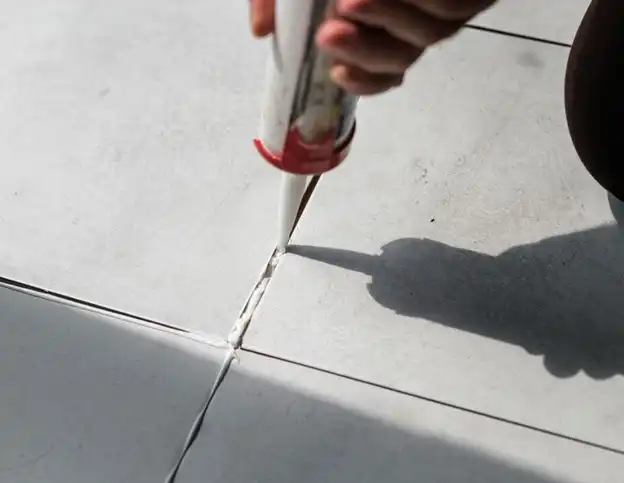
Choosing the Right Grout
Sanded or unsanded grout is selected based on joint width. Color choice affects the final look more than many homeowners expect.
Application and Cleanup
Grout is pressed into joints with a float, then excess is removed with a damp sponge. Cleanup timing is critical to avoid haze and uneven joints.
Sealing, Curing, and Final Inspection
Some grout and tile types require sealing after curing. Cure times vary, but floors should not be walked on too soon. A final inspection ensures tiles are level, joints are full, and edges are properly finished.
Common Tile Installation Mistakes to Avoid
- Skipping subfloor preparation
- Inconsistent mortar coverage
- Rushing layout or grout cleanup
- Ignoring expansion gaps along walls
These mistakes often lead to cracking, lippage, or premature failure.
When to Call a Professional Installer or Contractor
Professional installation is recommended for uneven subfloors, large-format tile, complex layouts, or projects tied to broader remodeling work. When tile installation intersects with framing changes, layout modifications, or larger renovation goals, working with a construction firm like Capital Construction can help ensure all aspects of the project are coordinated properly.
Conclusion
Learning how to install tile floor involves much more than placing tile on mortar. Success depends on preparation, layout planning, material selection, and patience at every step. For smaller projects, a careful DIY approach can deliver excellent results. For larger or more complex installations, professional expertise often provides better long-term value. Either way, a properly installed tile floor adds durability, function, and lasting appeal to a home.
Comments on this guide to How to install tile floor, home flooring remodel article are welcome.
Home Flooring Design
House Flooring Design Posts
Top 5 flooring trends for 2026

Rugs in interior design: ways to uplift a room
++
Building Articles
Residential Architecture
Comments / photos for the How to install tile floor Step-by-Step advice, home flooring remodel material styles page welcome.